SharePoint 2007 – Org Chart Web Part Options

SharePoint 2007 provides the ability to view the profile of people within an organization and also to view a very basic organizational chart listing peers and subordinates.   I recently researched the options available for displaying a more advanced organizational chart and found there are several third-party web parts that provide this functionality for a fee, I also found a free option and also some sample code. 

At the SharePoint 2009 conference this year in Las Vegas I also saw a demonstration of a SilverLight web part that will provided as part of the SharePoint 2010 product that provide a really slick and interactive org chart interface (but you’ll have to wait for SharePoint 2010).  If you’re currently using SharePoint 2007, below are some good options for adding a better org chart to your site.

Third party Solutions

1OrgChart by ContentAndCode provides highly customizable org chart that is beautiful, especially if you store photos of your employees.  Some of the key features include:

  • Create organizational charts using information from User Profiles populated by Active Directory or another line-of-business applications
  • Online presence indicators allowing you to see when staff members are online and/or available.
  • Create organizational charts from a custom list
  • Create charts by organization, department or people
  • Decide which properties will be displayed
  • Decide the order in which properties will be displayed
  • Print charts as an image or to a printer
  • Expand/collapse branches in the chart
  • View personal profiles by clicking on a user name
  • Hide accounts that you do not want included in the charts
  • Search for people in the chart
  • Include or exclude photos from the chart
  • Limit the number of people to display in the charts
  • Automatically picks up the SharePoint site styles or theme
  • Turn on caching options to improve performance

SharePoint Org. Chart Web Part by KwizCom is a very nice solution at a very reasonable cost.  This web part isn’t as visually appealing as some of the other web parts but does provide a nice tree-view of the organization that other don’t provide.  It also has a nice pop-up window when you hover over an individual’s name, a nice touch.  Some of the key features include:

  • Hierarchical/flat view
  • Based on a standard Excel/XML file format, therefore enables easy integration with corporate HR system
  • Dynamically configurable view (you decide which columns should be displayed)
  • Textual & property-based filtering capabilities
  • Web part’s layout is fully customizable (CSS files and images)
  • Support filtering by URL parameters and by Web Part Connections

AA OrgChart by AASoftech is another low cost option which consists of three separate web parts.  The web parts work together to display organizational data in a tree view and also a searchable list view.  Some of the key features include:

  • Can directly connect to SharePoint User Profile on MOSS (SharePoint Server 2007)
  • Supports Multi Manager when connecting to SharePoint User Profile on MOSS (SharePoint Server 2007)
  • Can directly connect to SharePoint List
  • Supports XML data as input
  • Can also get data from SQL server, Access, Oracle, Excel, Text, SharePoint List, User profile or Active directory
  • Can lunch other application from the chart
  • Can display OrgChart in any Sort Order of the existing fields
  • Can display Query result (Employee Locator) in different styles
  • Can locate (Search) employee
  • Displays the Organization Hierarchy in Tree View as well as Chart View
  • Accepts Query string to browse the chart
  • Displays up to 11 data fields on "OrgChart" Web Part
  • Can browse the chart from specific Node

User Directory Web Part by Bamboo Solutions is an all-encompassing employee directory, employee search, organizational chart, and employee listing all wrapped up into a single web part that can be easily dropped onto any page in your site.  This is an amazing web part but if you’re simply looking for an organizational web part it may have (dare I say it) too much functionality.  The key features include:

  • View SharePoint and/or Active Directory users in a tree view structure
  • View and edit both Active Directory and SharePoint User Profile databases
  • Maintain and delegate security for profile updating to department level
  • Search for users by name or other metadata such as skill set, or user customized fields
  • Audit trail of changes to Active Directory
  • Maintain restriction on private and non-editable attributes
  • AJAX web part eliminates annoying post backs and enhances usability
  • Email notification when changes are made to profile database

Free Solutions

SimpleChart by ARB Security Solutions is a simplistic organizational chart displayed in a graphical manner.  This web part only accepts data from a SharePoint list, but with some creative thinking you can probably get your organizational data into a SharePoint list. 

Graphical Organizational Chart by Sue Hernandez is a set of fairly complete C# web part code using the Profile Manager and Google’s Org Chart API to display organization data in a nice graphical format.  She does a nice job of explaining the code and providing all the necessary pieces to build your own graphical display of your organizational chart. 


Feel free to comment if you find other solutions that you’d like to recommend.

SharePoint 2007 – Inline CSS Styles to Customize Pages

I am often asked to customize the layout of a page within a SharePoint site as a “one-off” change (one that affects only that page and not the entire SharePoint site).  This is typically a request to hide something on the page or to change the attributes of a font on a page, such as hiding the quick launch bar, hide the breadcrumbs or increasing the font on a header.  These changes are often small and don’t necessarily require a change to the site master page or style sheet (.css file).  One of my favorite tips is to use “inline CSS styles” to apply style changes to a page. 

My solution basically consists of adding a Content Editor web part to a page and including style sheet instructions that override the current page styling (as HTML style tags within the Content Editor web part).  The beauty of this solution is that it does not require changes to the site style sheet and can be isolated to just one page.  The down-side to this approach is that the change only impacts one page at a time, and you must apply this technique for each page you wish to change.

In this article I will provide you the specific instructions needed to inline CSS styles to customize your pages. 

Example Request: Hide the breadcrumb on our news article page.

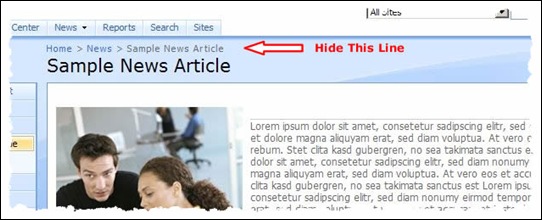
Let’s pretend we’ve received a request to hide the breadcrumb line so that the page title is at the top of the page.  The user is basically asking us to make remove the words “Home > News > Sample News Article” and make the words “Sample News Article” appear at the top of the page.

blogpost1


Step 1: Add a Content Editor web part to the page and make it hidden.

Open the page in edit mode and add a web part to the page of type “Content Editor web part”.  You do this by using the “Site Actions” menu and selecting “Edit Page”.  Modify the properties of the web part so that the web part is hidden.  You do this by checking the “Hidden” box inside the Layout section of the web part settings panel.  Important note: Even though you’ve hidden the web part the CSS styles still effect the contents of the page.

blogpost2 


Step 2: Identify the styles to override in the HTML source of the page.

Open the HTML source of the page and look through the HTML for the area you want to effect.  Both Internet Explorer and Firefox provide a menu option for viewing the HTML source for a page; in Internet Explorer you’ll need to use the View menu and select Source.  After opening the HTML source you can search for the desired HTML area, In our case we can do a find on “Sample News Article” to find the breadcrumb area.  See the following code example; notice the CSS class named “breadcrumb” that is applied to the HTML “div” tag, we will be applying a change to the “breadcrumb” class to override the styling of the breadcrumb text.

<div class="breadcrumb">
    <span id="ctl00_PlaceHolderTitleBreadcrumb_siteMapPath">
    <span><a class="ms-sitemapdirectional" href="/Pages/Default.aspx">Home</a></span>
    <span> &gt; </span>
    <span><a title="Company News Home" class="ms-sitemapdirectional" href="/News/Pages/Default.aspx">News</a></span>
    <span> &gt; </span><span class="breadcrumbCurrent">Sample News Article</span></span>
</div> 


Step 3: Use the HTML Editor to add style tags to override the page styles.

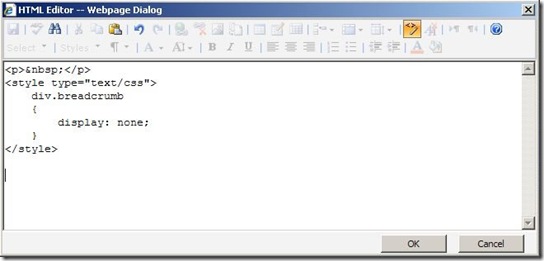
Open the Content Editor web part and use the “Source Editor” button to add HTML directly into your page.  Enter your CSS commands in the middle of <style></style> tags.  See the example below where we override the breadcrumb div tag by using the CSS display property to hide the breadcrumb div.

blogpost3

 blogpost4

<p>&nbsp;</p> 
<style type="text/css"> 
    div.breadcrumb 
    { 
        display: none; 
    } 
</style> 


Step 4: Preview the page and make adjustments if necessary.

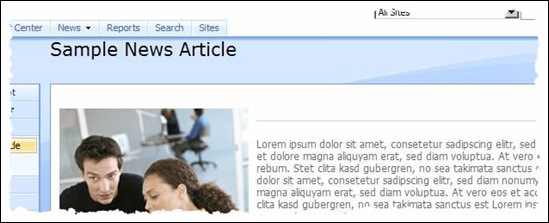
Save the changes to the Content Editor web part and publish your changes.  Be sure to preview the page to see if the CSS style overrides you applied are what you expected.  If not, you’ll need to back up a few steps and try again.

plogpost5 


My hope is that this technique of applying inline CSS styles directly into your SharePoint pages can give you another option for formatting your pages.  Again, this technique can be particularly useful when you have a change that affects only a single page and does not need to affect the entire SharePoint site.  Good luck and let me know if you come up with other creative uses for applying inline CSS styles.

I am Speaking at SharePoint Techfest Dallas TX 2009

techfest2009 

For those of you who are local to the Dallas / Fort-Worth area (or who will be traveling in for the conference), I will be speaking  at SharePoint Techfest on May 6th, 2009, the largest SharePoint conference in the Central US. 

Topic: BI Enabling Your Enterprise Content

Description: Explore strategies and see practical examples of how to enable your unstructured data (documents/files) within MOSS 2007 to make better business decisions. Topics will include developing a metadata strategy, leveraging Faceted Search, exploring the Business Data Catalog and implementing powerful workflows using document metadata.

http://www.sharepointtechfest.com/

Dallas Infomart
1950 N. Stemmons Frwy.
Dallas, TX  75207

Discount code:  AC-SPTF-CUSTPROM

scott_headshot_250x250 Scott Wheeler is a SharePoint architect and Business Intelligence consultant in the Dallas / Fort-Worth area.  He specializes in building Intranets, Extranets, and Business Intelligence Dashboards using Microsoft SharePoint technologies.  Scott also specializes in SharePoint branding and usability.   View Scott’s LinkedIn profile.

SharePoint 2007 – Branding Your application.master Page

Most SharePoint administrators and developers are aware of the techniques for customizing the master page for a SharePoint site, so I am not going to go into detail on this topic.  However, I do want to share with you any easy technique I found for customizing the administrative pages on a SharePoint using the application.master file.

A quick background on administrative pages vs. regular SharePoint pages:  Most content pages that you create within a SharePoint site are stored within the content database and are easily styled using a custom master page and style sheet specified on the site settings page.  These pages typically consist of web part pages, home pages, and other pages you create to display SharePoint content, these pages inherit the master page and CSS settings that you specify in the site settings of your SharePoint site.

The other types of pages that you see within SharePoint pages are called “administrative pages” or “application pages”.  Those pages are supplied by Microsoft as part of the SharePoint installation and are used to configure and administer your SharePoint site, these pages are NOT stored in the content database and are instead stored on the file system in the _Layouts directory (typically this is C:\Program Files\Common Files\Microsoft Shared\Web Server Extensions\12\TEMPLATE\Layouts ).   Another important difference between these two types of pages is that all the styling of administrative pages is specified in a single master page named “application.master” which is stored on the file system in the _Layouts folder. 

One very important note about the styling of administrative pages using the application.master is that each SharePoint farm can only have one application.master file in the _Layouts folder, which typically means that ALL your administrative pages across your entire SharePoint farm must share the same styling.  This can present a design challenge if you are a SharePoint administrator and you are asked to have different styling for different sites and site collections within the same SharePoint farm AND you need the administrative pages to be styled consistently with those sites and site collections.  In a future post I will present some options on how to address this limitation.

Back to the easy technique for branding (styling) your application.master page.  Standard master pages and the application.master file are generally the same but do have some very slight differences.  You cannot simply copy your regular master page content into the application.master file and expect everything in SharePoint to work perfectly, they are not 100% compatible.  However, you can take your regular master page and tweak it (with little effort) to use as your application.master file.  Below is an outline of the “tweaks” that need to be made

Tweak 1.  Application.master files should not contain the delegate control for the SmallSearchInputBox.  You can simply remove the following reference from your master page:

                        <SharePoint:DelegateControl runat="server" ControlId="SmallSearchInputBox"/>

Tweak 2.  Application.master should also contain the following content placeholder tags, several pages within the _Layouts folder rely on these tags:

                        <asp:ContentPlaceHolder id="PlaceHolderPageDescriptionRowAttr" runat="server" />
                        <asp:ContentPlaceHolder id="PlaceHolderPageDescriptionRowAttr2" runat="server" />

Thus far I’ve only found these two tweaks, or changes, needs to be made to a master page in order to use it as your application.master page.  If you find that there are other required tweaks, please pass those along to me so that I can update my post.

SharePoint 2007 – Branding Your application.master Page

Most SharePoint administrators and developers are aware of the techniques for customizing the master page for a SharePoint site, so I am not going to go into detail on this topic.  However, I do want to share with you any easy technique I found for customizing the administrative pages on a SharePoint using the application.master file.

A quick background on administrative pages vs. regular SharePoint pages:  Most content pages that you create within a SharePoint site are stored within the content database and are easily styled using a custom master page and style sheet specified on the site settings page.  These pages typically consist of web part pages, home pages, and other pages you create to display SharePoint content, these pages inherit the master page and CSS settings that you specify in the site settings of your SharePoint site.

The other types of pages that you see within SharePoint pages are called “administrative pages” or “application pages”.  Those pages are supplied by Microsoft as part of the SharePoint installation and are used to configure and administer your SharePoint site, these pages are NOT stored in the content database and are instead stored on the file system in the _Layouts directory (typically this is C:\Program Files\Common Files\Microsoft Shared\Web Server Extensions\12\TEMPLATE\Layouts ).   Another important difference between these two types of pages is that all the styling of administrative pages is specified in a single master page named “application.master” which is stored on the file system in the _Layouts folder. 

One very important note about the styling of administrative pages using the application.master is that each SharePoint farm can only have one application.master file in the _Layouts folder, which typically means that ALL your administrative pages across your entire SharePoint farm must share the same styling.  This can present a design challenge if you are a SharePoint administrator and you are asked to have different styling for different sites and site collections within the same SharePoint farm AND you need the administrative pages to be styled consistently with those sites and site collections.  In a future post I will present some options on how to address this limitation.

Back to the easy technique for branding (styling) your application.master page.  Standard master pages and the application.master file are generally the same but do have some very slight differences.  You cannot simply copy your regular master page content into the application.master file and expect everything in SharePoint to work perfectly, they are not 100% compatible.  However, you can take your regular master page and tweak it (with little effort) to use as your application.master file.  Below is an outline of the “tweaks” that need to be made

Tweak 1.  Application.master files should not contain the delegate control for the SmallSearchInputBox.  You can simply remove the following reference from your master page:

                        <SharePoint:DelegateControl runat="server" ControlId="SmallSearchInputBox"/>

Thus far I’ve only found that this one “tweak” or change needs to be made to a master page in order to use it as your application.master page.  If you find that there are other required tweaks, please pass those along to me so that I can update my post.

SharePoint 2007 – Page Redirection / Bad Links Solution

Recently I was faced with this customer situation: “Replace my existing web site with a SharePoint 2007 site AND handle all the existing links to my site gracefully”.   Basically the customer asked me to build them a new public facing web site and asked that their existing page links (those in search engines, other web sites and links saved by their customers) continue to work and don’t become “dead” links.

I’ve heard this request when building Intranet sites and Extranet sites, but it’s probably most important when SharePoint 2007 replaces an existing Internet site because you have less control and contact with the audience.  With Intranet and Extranet sites you often have the ability to notify site users that the links to their sites and documents may be broken and you may even provide documentation and training on how to deal with the new site taxonomy.  With Internet sites you don’t have the same relationship with your users (customers) so your SharePoint 2007 site often has to handle the old links gracefully. 

With public facing sites you often reply upon search engines (Google, Live Search, Yahoo, etc) to find your site and you want to be sure that the stale links in those search engines do not lead to dead ends.  Most search engines today provide webmaster tools that allow you to remove dead links and provide updates site maps.  See my article on site maps for SharePoint.   Below are links to the three most popular search engine webmaster tools:

There are two basic approaches for solving the page redirection and bad link issues; 1.  Translate the http requests before they reach the site, or 2. Make the site “smart” so that it can redirect the http requests to the appropriate destination.

Things to consider before you begin building a solution:

1.  Identify all potential inbound links to your site and document those (I recommend creating a SharePoint list or spreadsheet).  Be sure to visit all major search engines to see what pages are indexed by those search engines, those links should be included in your list.

2.  Determine if your inbound links use query string parameters; for example: a link like http://www.kroger.com/privacypolicy.htm does not use query string parameters where a link like http://www.kroger.com/page.asp?tabid=143 does use query string parameters.  This will depend heavily on the technology used to implement the site you are replacing and may impact your choice on solutions.

3.  Identify the tools at your disposal; For example; is there a hardware-based firewall, a software-based firewall, load balancing software, load balancing hardware.  It is often easier to leverage one of these tools for page redirection rather than going down the custom programming path.

Solutions for handling page redirection include the following:

1.  Firewall or Load Balancing – Configure your firewall to “listen” for the set of inbound links and have your firewall redirect the request to the desired destination page.  If you are using Microsoft ISA Server you can enable Link Translation to handle the transition to the new addresses.  Other firewalls and load balancing solutions provide similar functionality to ISA, so be sure to check with your vendor.

2.  Custom Redirection Page – Implement a custom ASP.NET page inside SharePoint to handle all 404 errors.  

3.  Use the Codeplex Smart 404 Feature created by Josh Carlisle.  This is the solution I’ve used the most and I’ve found it very effective. 

In my next post I will guide you through the use of the Smart 404 Feature and provide you some sample code for extending the functionality of that feature.

SharePoint 2007 – Sitemap XML files for Better Crawling by Search Engines

If you are using SharePoint to build a pubic facing web site and you’d like your site to indexed (sometimes called crawled in SharePoint speak) by the popular Internet search engines (Google, Live Search, Yahoo, etc) you’ll want to pay particular attention to this article.  

By provide two XML files named sitemap.xml and sitemap_index.xml at the root of your site you will improve your odds of having search engines properly crawl your SharePoint site.  For example: http://www.example.com/sitemap.xml and http://www.example.com/sitemap_index.xml 

When your web site is indexed by search engines all the URLs listed in the sitemap file will be indexed and followed. The data provided in sitemap will let the search engine know what pages to crawl, the frequency the web page is updated and how important the page is to your site. Sitemap files do not totally guarantee your site will be indexed and receive high search engine rankings, however it is an important step to assist search engines which could lead to better results.

Here’s how the two files work together: sitemap.xml is an xml file that lists the pages in your web site, sitemap_index.xml is a file that references your sitemap.xml and allows you to provide multiple sitemap.xml files. 

Here is an example of what a sitemap.xml document should look like:

<?xml version="1.0" encoding="UTF-8"?>↵
<urlset xmlns="http://www.sitemaps.org/schemas/sitemap/0.9">
<url>
    <loc>http://www.example.com/index.html</loc>
    <lastmod>2008-04-20</lastmod>
    <changefreq>monthly</changefreq>
    <priority>0.9</priority>
</url>
<url>
    <loc>http://www.example.com/news.html</loc>
    <lastmod>2008-08-22</lastmod>
    <changefreq>daily</changefreq>
    <priority>0.5</priority>
</url>
<url>
    <loc>http://www.example.com/tips.html</loc>
    <lastmod>2008-08-22</lastmod>
    <changefreq>daily</changefreq>
    <priority>0.5</priority>
</url>
</urlset>

Basically you want to have one <url> tagset for each page on your web site that you want indexed  The tag <loc> is the only required element inside the <url> tagset, the tags <changefreq> and <priority> are optional.

A sitemap.xml file should contain no more than 50,000 URL’s. If this is exceeded you will need to create a sitemap index file (sitemap_index.xml) which can contain up to 1000 sitemap.xml entries.  There are also facilities to compress your sitemap files if they become very large.

Here is an example of what a sitemap_index.xml file should look like:

<?xml version="1.0" encoding="UTF-8"?>
<sitemapindex xmlns="http://www.sitemaps.org/schemas/sitemap/0.9">
   <sitemap>
      <loc>http://www.example.com/sitemap.xml</loc>
      <lastmod>2008-05-01T16:44:12+00:00</lastmod>
   </sitemap>
   <sitemap>
      <loc>http://www.example.com/sitemap2.xml</loc>
      <lastmod>2008-05-01</lastmod>
   </sitemap>
</sitemapindex>

There’s a great page that details out the complete specifications for sitemap files on the www.sitemaps.org web site.  Read the complete specification here.  

Sitemap and sitemap index files are simple to create if you have a small site, but how would you create one for a large site, one with many many pages or one with extremely dynamic content (adding pages, deleting pages, adding subsites frequently)?  The answer is to use one of the following tools (there may be more) to generate your sitemap files for you.  Both of the following software pages are written to explore a SharePoint site using the SharePoint object model, then create the sitemap files and automatically save them at the root of your site.

KWizCom SharePoint XML Site Map Builder

Tim Dobrinski’s sitemap tool

SharePoint 2007 – Development Tip: Use Virtual PC for SharePoint Development

Many of you may know that I’m a huge fan and user of Virtual PC and Virtual Server for development purposes, specifically SharePoint development. Both Virtual PC and Virtual Server are Microsoft Products and both are free to use and provide big advantages when developing solutions for SharePoint 2007.  When a server instance has been vitrualized it is referred to as the “Guest” operating system and is often called the “Virtual Machine” or “VM”.  The “Host” system is the physical computer that runs the Virtual PC or Virtual Server software and has the ability to host multiple guest virtual machines (VMs).  Now with the VM hosting role built into Windows 2008 Server and the Hyper-V technology, scalable virtualization is built right into the Windows operating system.

Some of the biggest advantages to doing development within a VM are:

1.  The host machine and guest VMs can be running different operating systems, they can even be running different processor types (32 bit vs 64 bit)  I typically do development on laptop running Windows Vista Business and run Virtual PC to run guest operating systems like Windows 2003 Server.

2.  Once you have a library of “base” VMs you can quickly and easily spin-up a new VM and customize it. 

3.  VMs run in a an isolated environment so you can create virtual environments or virtual networks to simulate different networking and SharePoint farm topologies.

4.  VMs are stored within a single file which makes them much more portable.  This allows you to quickly move them from one host to another host with ease.

I’ve been using virtualization exclusively for software development for about two years now. Sure, there’s a slight performance hit, but you can’t beet the flexibility you gain from having one (or more) isolated development environments. Before I started using Virtual PC, it was common for me to be wiping my laptop once every 4 to 6 months. Now, since I don’t run any development tool software on my host OS, it’s rare that I have to rebuild my host machine. And, of course, creating new virtual PC’s is a snap.  The following article is written as a guide to getting the most out of doing SharePoint development work using virtual machines.

1. Create a Library of Virtual Machine Images

In order to quickly create development environments I have created “base” VM images and preconfigured environments.  With disk space being as cheap as it is today do not be afraid to create many different VMs.  My base VM include : Windows 2003 Standard, Windows 2008 Enterprise, Windows 2008 Enterprise R2, etc.  My preconfigured SharePoint environments include: MOSS 2007 RTM running on SQL Server 2005, MOSS 2007 SRTM running on SQL Server 2005 SP2, MOSS 2007 SP1 running on SQL Server 2000, WSS3.0 running on SQL Server 2005 Express, etc.  You get the point.

2. Create Virtual Machine Images with Development Tools

Another huge time saving tip is to create full blown development environment VMs that have all your standard development tools installed and configured.   Be sure to save a copy of the development environment VM as a “base” so that you can quickly spin-up a new one for your next project.   Some of the tools I have installed on my common development environment VMs include: Visual Studio 2008, SharePoint Designer 2007, Visual Studio Extensions for Visual Studio 2008, WSPBuilder, STSDEV, etc.

2. New Image for Each Project

One of my favorite tips is to create a new VM for each project that I work on.  I work with many different clients at a time and each of my clients has a different variation of MOSS software installed (SQL versions, OS versions, MOSS service packs and patches, etc) so I like to create a new VM for each client project that matches their exact environment.  I’ve found this to be extremely useful when trying to debug an issue for a client because I can quickly recreate the issue on my VM that matches their environment.

3. Use External USB Drive and have plenty of RAM

The best performance mix I’ve found comes from running my VMs from an external USB Hard Drive so that the operating system on the guest VM and the host PC don’t compete for disk.  I’ve also found that having more than 3GB of RAM on my host machines is best, I typically give allow my guest VMs to have about 1.5GB of RAM which leaves 1.5GB of RAM for my host machine.  You may find that you can get away with only 2GB or RAM on your hosting computer if you are running WindowsXP but I typically run Windows Vista on my computers so I like to have 3GB of RAM.  Note: 3GB or RAM is the minimum I recommend, if you want to host multiple VMs on a single host computer you’ll more than 3GB.


Additional Information and Links

Instructions for configuring a SharePoint 2007 development environment

http://msdn2.microsoft.com/en-us/library/bb330848.aspx

Microsoft Windows 2008 Server with Hyper-V

http://www.microsoft.com/windowsserver2008/en/us/hyperv.aspx

SharePoint 2007: Determine SharePoint Version

If you’ve ever tried to quickly determine the version of SharePoint 2007 that is installed on a server, this post is for you.  I’ve often thought that Microsoft should have displayed the SharePoint version on Central Administration under Operations, Servers in Farm.  However, they did not do this and you must examine the properties of files on your servers or the IIS web server to determine the SharePoint version running on the server. 

There are two basic ways you can determine the version:

  1. Navigate to the \12\bin\ folder and check file versions (For more information on the first technique read this TechNet article)
  2. Use IIS Manager and look at the web site properties

I prefer the second approach because it takes some of the guesswork out of the process.  The basic steps for using IIS Manager to determine the SharePoint version are:

  1. Sign in one of your SharePoint front end web servers
  2. Open IIS Manager (can be found by navigating to Start, Administrative Tools, Internet Information Server (IIS) Manager)
  3. Expend the folder labeled “Web Sites”
  4. Right-click on the web site named “SharePoint Central Administration” and select “Properties”
  5. Click on the tab named “HTTP Headers”
  6. Look at the field named “Customer HTTP Headers”
  7. Compare the value displayed for “MicrosoftSharePointTeamServices” to the following list.

(Please note: These instructions are written for Windows Server 2003, the instructions may be different for Windows Server 2008)

Special thanks goes to Penny Coventry for creating an excellent listing of the specific version numbers, build numbers and hotfix combinations. 


SharePoint 2007 – Hiding fields on NewForm.aspx and EditForm.aspx, the easy way

One of the limiting factors in using the default forms (NewForm.aspx, EditForm.aspx) is that there is no obvious way to hide columns from appearing in the form.  By default all columns in a list or document library will appear in your forms. 

After doing quite a bit of research on this I found a fairly easy way to hide fields by using JavaScript within the form pages themselves.  In my research I found several different sets of JavaScript code, but some of the scripts are easier to implement than others.  Below I provide the best and most straight forward JavaScript and some simple steps to guide you along.

To hide fields in a SharePoint 2007 form, follow these steps (I will use the NewForm.aspx in my example)

  1. Open SharePoint Designer and navigate to the site that contains the list or document library you wish to customize.
  2. Expand the folder named “Forms” under the desired list or document library.  You should see about seven .aspx pages (AllItems.aspx, EditForm.aspx, NewForm.aspx, etc)
  3. Open the NewForm.aspx page and switch to the “code” view to edit the HTML of the page.
  4. Paste the JavaScript code immediately below the the following HTML tag <asp:Content ContentPlaceHolderId=”PlaceHolderMain” runat=”server”>  This will add the JavaScript to the HTML inside the content placeholder tag.  Note: be sure to include the entire script below, including the <script and </script> tags.
  5. Modify the “hidefields()” section of the JavaScript code to refer to each SharePoint list field name to hide.  For example, the code sample below will hide the SharePoint fields named Title, Document Link, and PublishDate    Notice that you do not need to worry about internal field names or field types like other JavaScript techniques, you simply need to know the name of the field.
  6. Save the changes.  Select “Yes” when prompted to “…customize the page from the site definition…”
  7. Test the form


<script language="javascript" type="text/javascript">

_spBodyOnLoadFunctionNames.push("hideFields");

function findacontrol(FieldName) {

   var arr = document.getElementsByTagName("!");
   // get all comments
   for (var i=0;i < arr.length; i++ )
   {
      // now match the field name
      if (arr[i].innerHTML.indexOf(FieldName) > 0)
      {         return arr[i];      }
   }
}

function hideFields() {

   var control = findacontrol("Title");
   control.parentNode.parentNode.style.display="none";
   control = findacontrol("Document Link");
   control.parentNode.parentNode.style.display="none";
   control = findacontrol("PublishDate");
   control.parentNode.parentNode.style.display="none";

}
</script>


I hope you find this technique for using JavaScript to hide form fields in SharePoint 2007 as useful as I did.  Thanks to the guys at CleverWorkarounds for writing an article on this.